Minimal Complications — Support
Last updated: October 5, 2026
Minimal Complications puts one small complication on your Apple Watch face that speaks up only when something needs your attention — a low battery, a cold morning, poor air — and stays quiet, out of the way, the rest of the time.
You set it up on your iPhone: you list the sensors you would want to be told about, give each one a threshold, and put them in order. The watch shows the highest one in your list that has crossed its threshold. When none has, the slot shows the quiet marker you chose.
The free app gives you one battery complication that appears below 20%. A one-time Pro unlock lets you change the threshold, add weather and air-quality sensors, reorder them, and choose among more quiet markers. This page walks through every screen. Most of the pictures were taken with Pro unlocked; where the free app differs, the text says so.
On this page
On your iPhone
The welcome screen
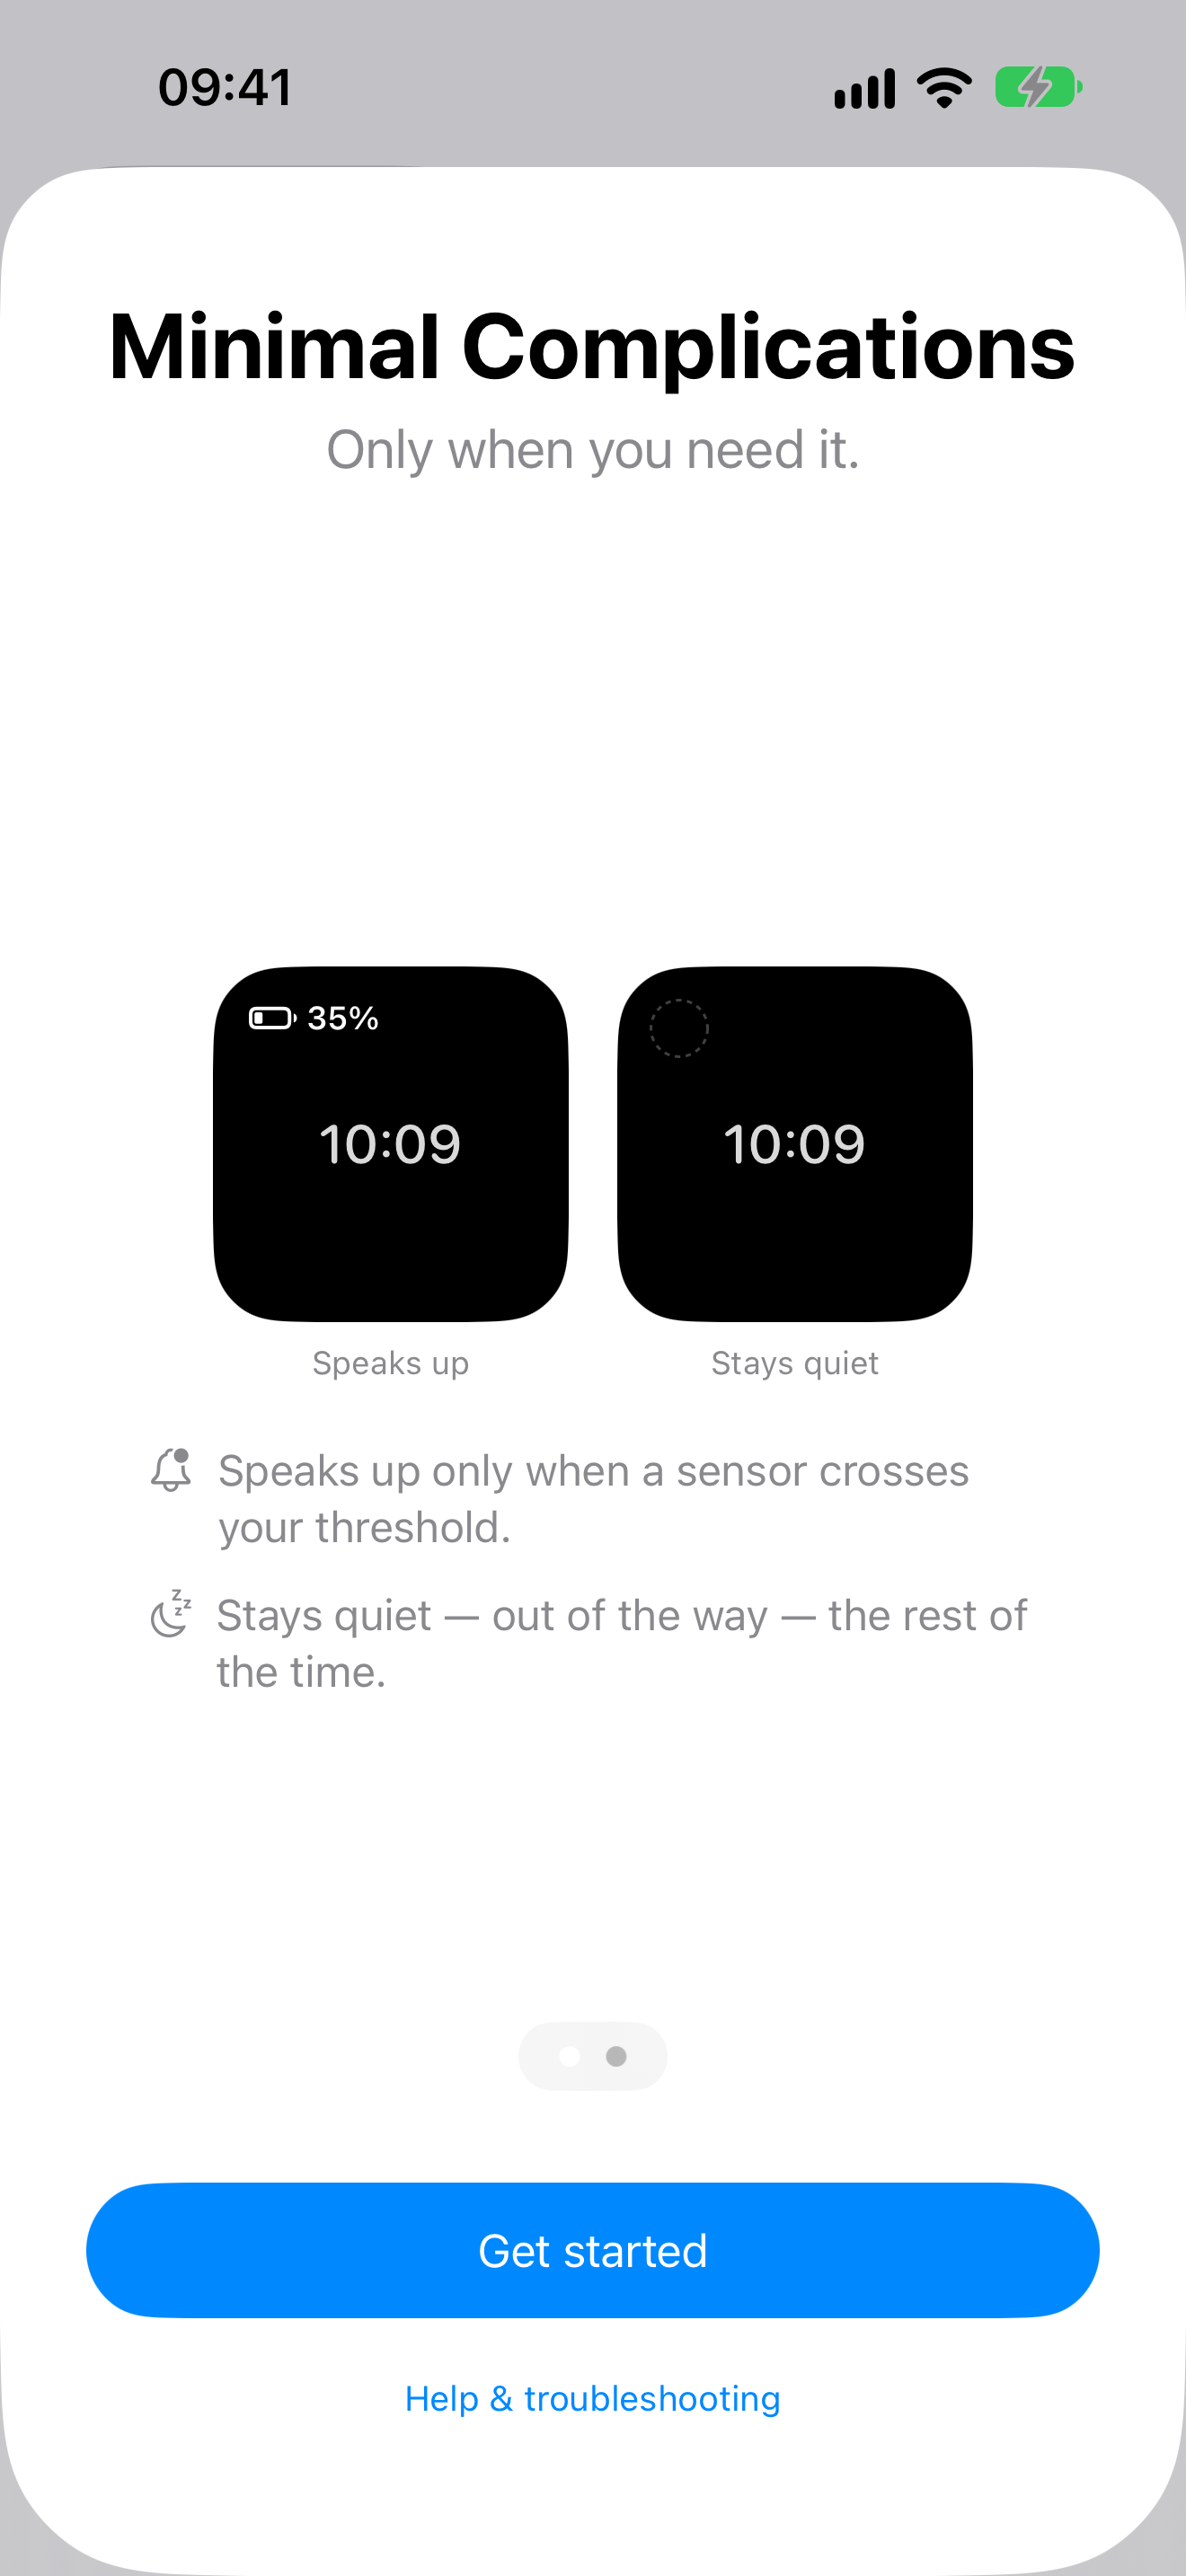
This is the first thing the app shows, and it explains the idea in two pages. Swipe sideways to move between them; the two dots show which page you are on.
- Page one shows the same watch face twice: on the left the complication speaks up with a battery reading, on the right it stays quiet. A sensor appears only when it crosses your threshold.
- Page two, “One slot, several sensors”, shows why a complication holds a list: you list what you would want to be told about, in your order, and whichever matters right now takes the slot.
- Get started closes the welcome and, the first time, opens the quiet marker picker so you can choose what the slot shows when nothing needs you.
- Help & troubleshooting opens the in-app help, which includes how to add the complication to a watch face.
You can bring this screen back at any time with the WHY? button on the complication list. Reopened that way, the button reads Got it and you can also swipe the screen down to close it.
The complication list
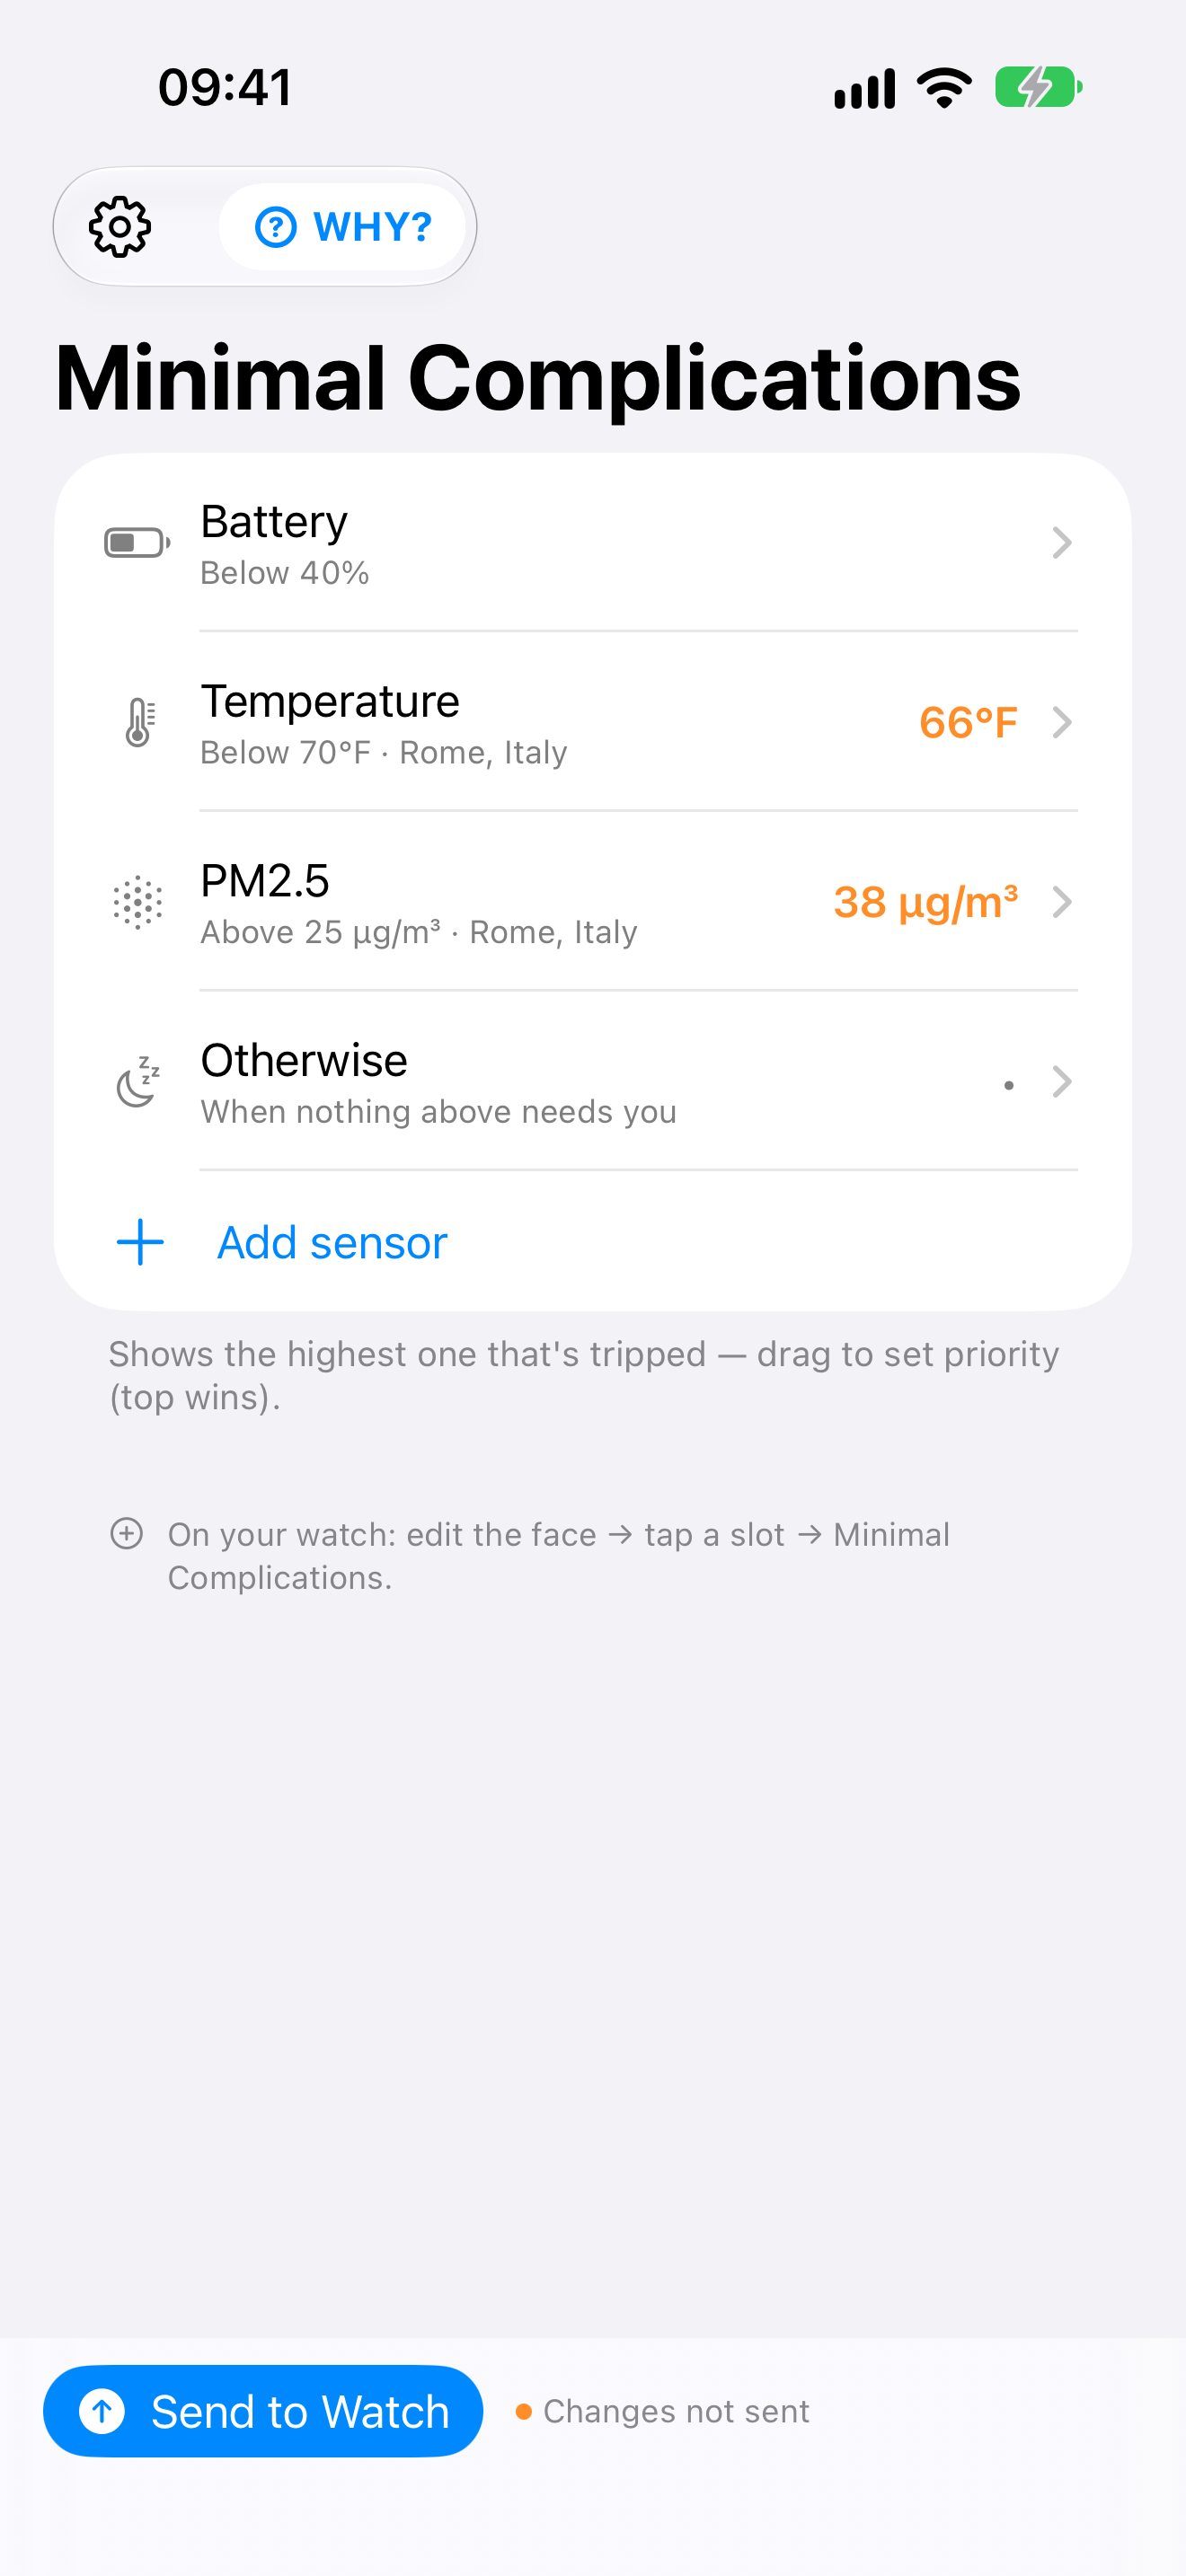
This is the app’s main screen. The card is your complication: its sensors from top to bottom, in priority order, ending with what the slot shows when none of them has anything to say.
- The gear (top left) opens Settings.
- WHY? reopens the welcome screen.
- Each sensor row shows the sensor, its rule (“Below 40%”, “Below 36°F · Verona, Italy”) and, for weather and air quality, the latest value on the right. The value turns orange when it has crossed the threshold. Tap a row to edit that sensor.
- Priority. When several sensors have crossed their thresholds, the watch shows the one highest in the list. With Pro, press and hold a row and drag it to change the order, or swipe a row to the left to delete it.
- Otherwise is always the last row and cannot be removed. It is what the slot shows when nothing above needs you; the symbol on the right is your current choice. Tap it to change the quiet marker.
- Add sensor (Pro) offers Battery, Weather and Air Quality. A weather or air-quality sensor needs a location; the first time, the app asks you to pick one and then opens the new sensor so you can set it up. A complication holds up to ten sensors.
- Send to Watch (Pro), in the bar at the bottom, sends your configuration to the watch. An orange dot and Changes not sent appear beside it while you have edits the watch has not received. After you tap it, a short message confirms the send; watchOS may take up to a few hours to show the change on the face, and More info in that message explains why.
- The line at the bottom of the list is a reminder of how to place the complication: on your watch, edit the face, tap a slot, and choose Minimal Complications.
In the free app the list shows one Battery sensor at “Below 20%” and the Otherwise row. Above the card is a banner with an Unlock Pro button showing the price. There is no Add sensor button and no Send to Watch bar.
Editing a sensor
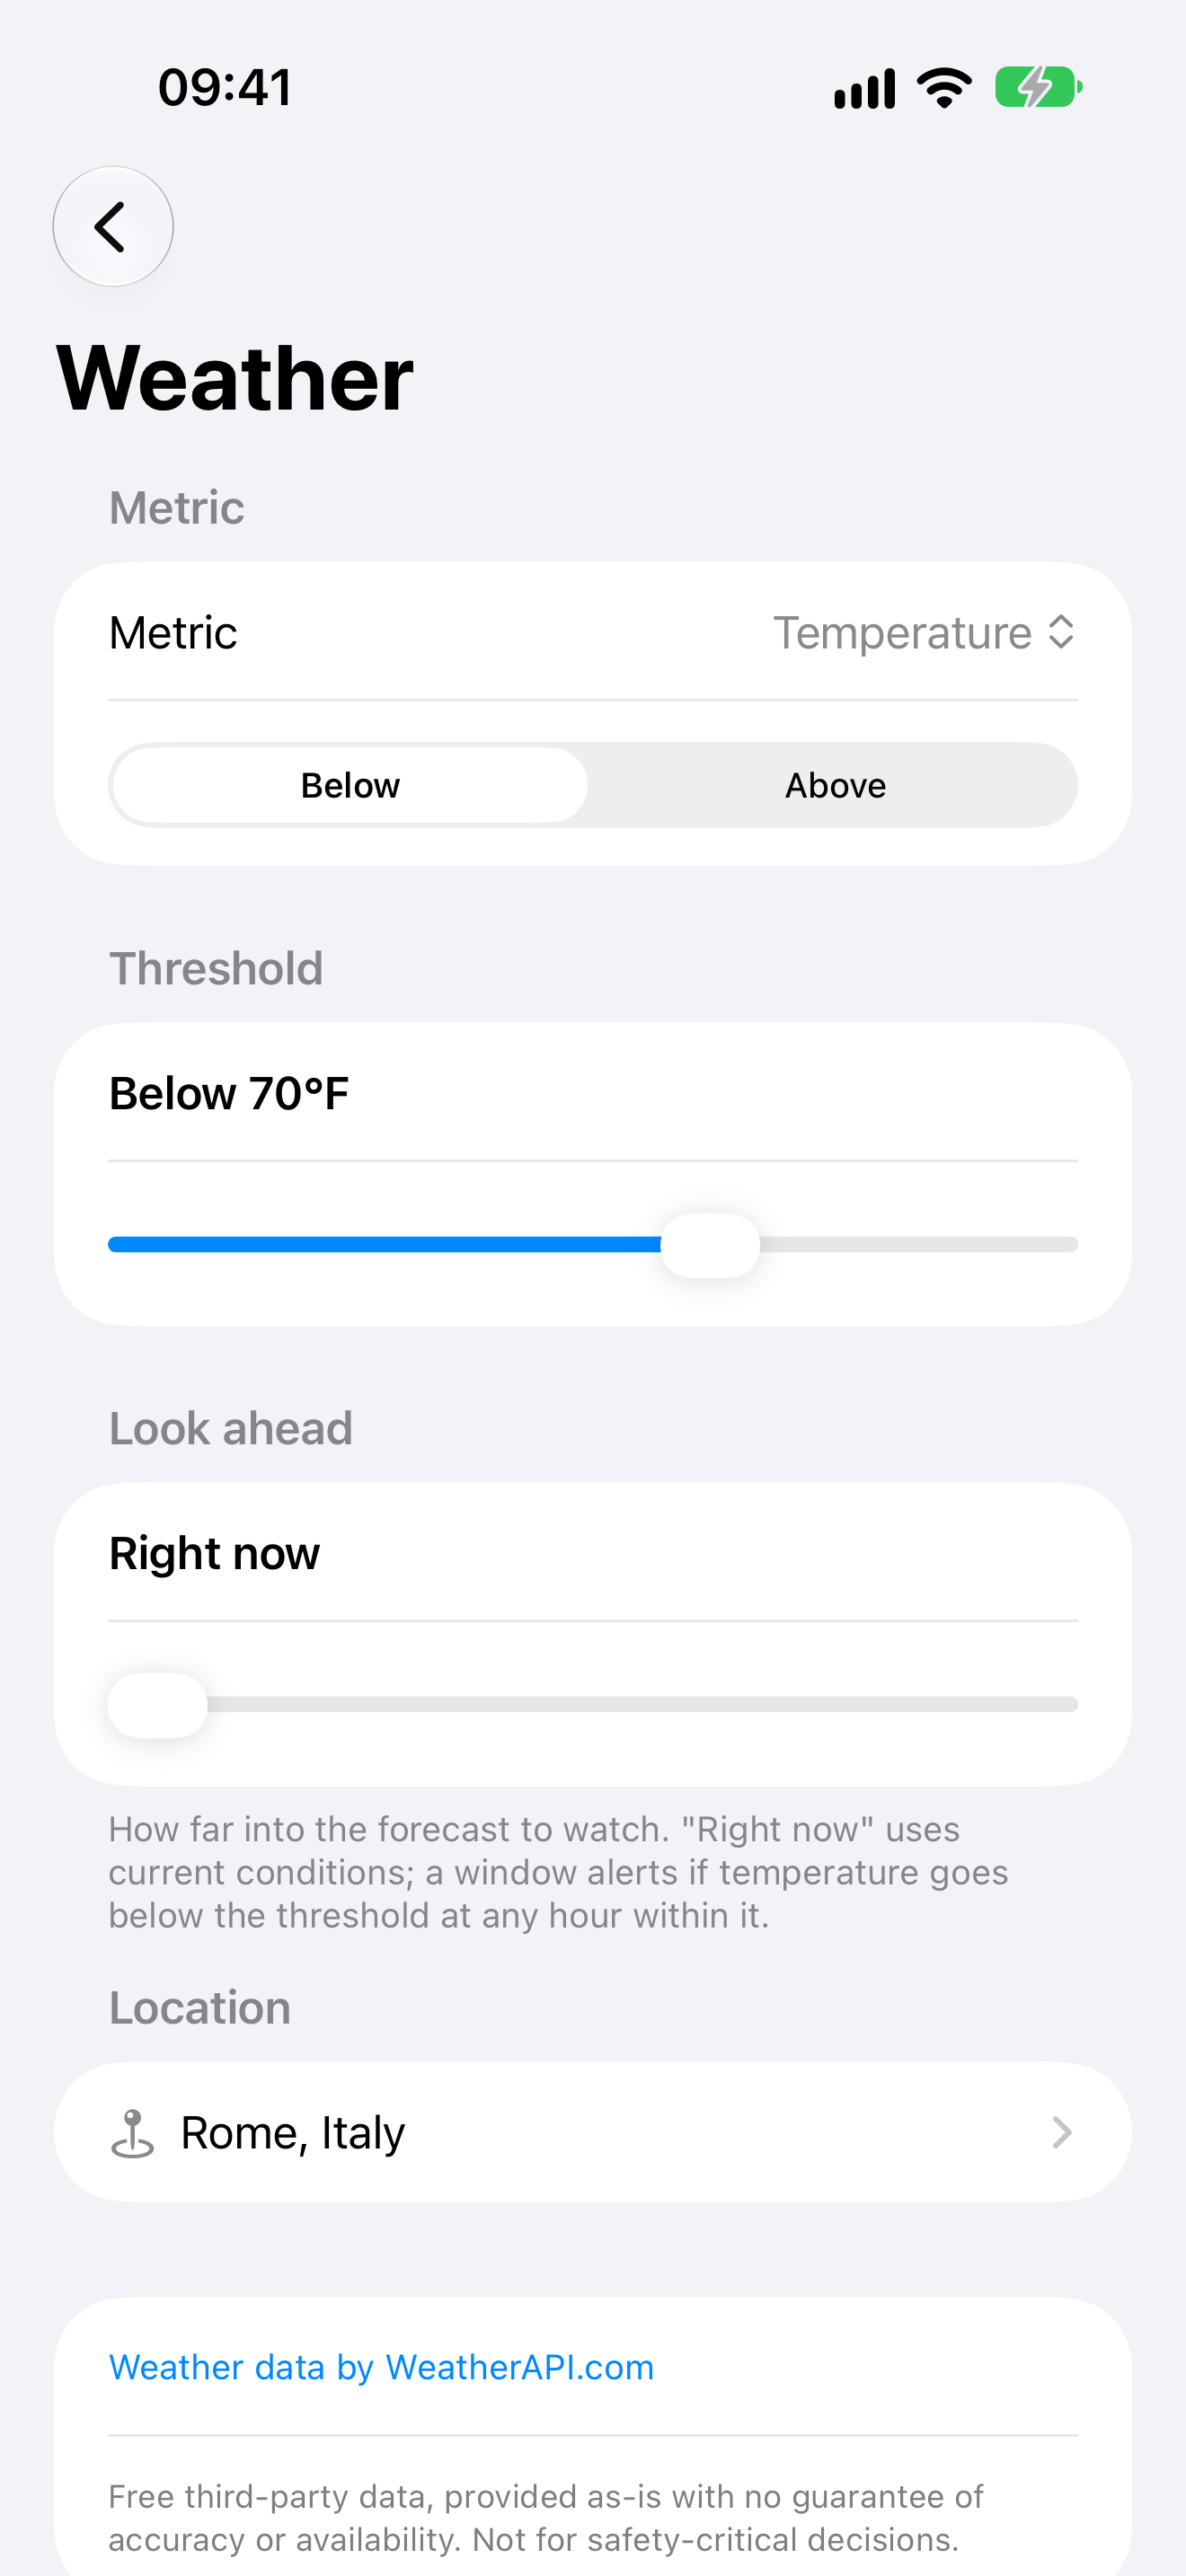
Tapping a sensor in the list opens its editor. This is where you decide when that sensor speaks up. The picture shows a weather sensor; an air-quality sensor has the same controls, and a battery sensor has fewer.
Weather and air quality (Pro):
- Metric chooses what is measured. Weather offers Temperature, Wind speed and Precipitation chance, which is the higher of the chance of rain and the chance of snow and shows a rain or a snow icon to match; air quality offers PM2.5 and PM10. Changing the metric resets the threshold to a sensible starting value for it.
- Below / Above chooses the direction: alert when the value falls below the threshold, or when it rises above it.
- Threshold is the line itself. Drag the slider; the heading above it reads the rule back to you (“Below 36°F”), in the units your region uses.
- Look ahead sets how far into the forecast the sensor watches. “Right now” uses current conditions only. Drag to the right, up to two days, and the sensor speaks up if the value crosses the threshold at any hour within that window — so you can be told this morning about frost tonight.
- Location shows the place the sensor reads. Tap it to choose another. A sensor with no location shows “Set a location” in red and cannot work until you pick one.
- Weather data by WeatherAPI.com opens the website of the service that provides the data. It is free third-party data with no guarantee of accuracy or availability, and is not meant for safety-critical decisions.
Battery:
- Alert below is a slider from 10% to 95%. The battery appears on the face only when your watch’s charge is below that level. Very low thresholds can be delayed by watchOS power saving.
- Always show keeps the battery on the face at all times, whatever its level. The slider is hidden while this is on.
In the free app the battery threshold is fixed at 20%. You can move the controls to see how they behave, but they return to 20% and the app offers the Pro unlock.
Changes you make here reach the watch when you go back to the list and tap Send to Watch.
Choosing a location
A weather or air-quality sensor reads one place, and this screen (Pro) is where you choose it. It opens when you tap the Location row in a sensor’s editor, and by itself the first time you add a weather or air-quality sensor, before that sensor exists.
- The map at the top shows a pin on the place currently set, under the heading “Current:” and its name. It is there to confirm the place; it does not scroll or respond to taps.
- Search city or place is the search field. Start typing and suggestions appear as you type.
- Results lists the suggestions, each with its region or country underneath so that two places with the same name can be told apart. Tap one to choose it: the app looks up where it is, saves it as “City, Country”, and closes the screen.
- If something goes wrong a short red message appears instead: “Couldn’t find that place — try another” or “Search failed — check your connection and try again”.
The app remembers the last place you chose, so the next sensor you add starts there. It does not use your iPhone’s own position and never asks for location permission; the only place it knows is the one you pick here.
The quiet marker (“Otherwise”)
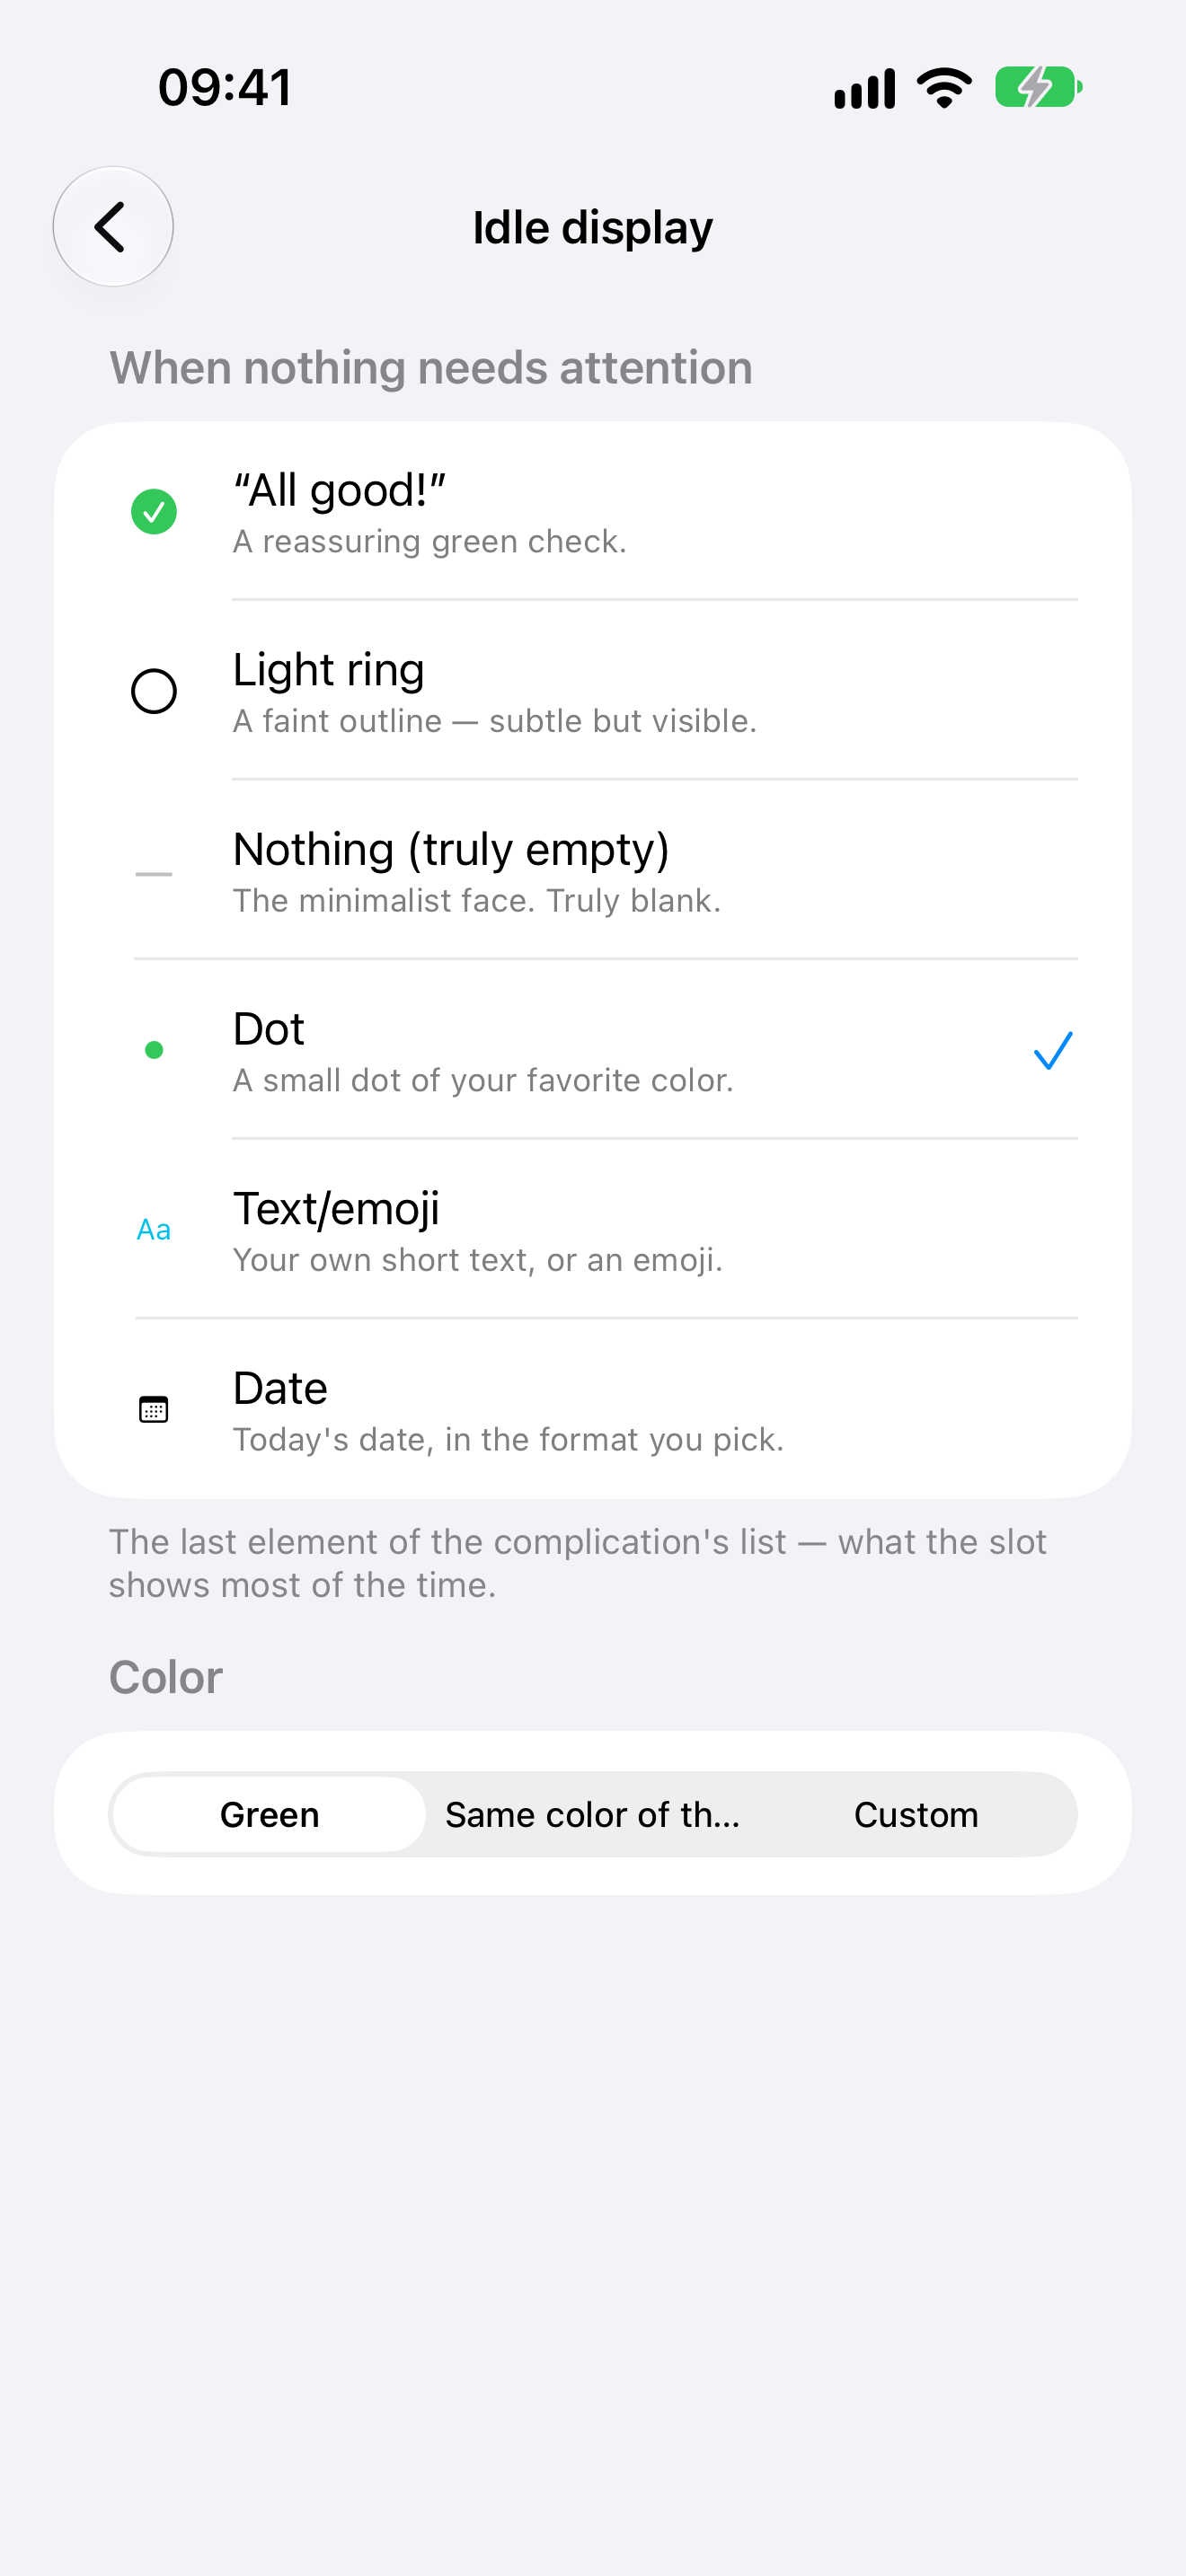
Most of the time none of your sensors has anything to say. This screen chooses what the slot shows then. It opens once right after the welcome screen, with a Done button, and afterwards whenever you tap the Otherwise row in the list. Tap a row to select it; the tick marks your current choice.
- “All good!” — a reassuring green check.
- Light ring — a faint outline, subtle but visible.
- Nothing (truly empty) (Pro) — the slot is completely blank.
- Dot (Pro) — a small dot in a colour you choose.
- Text/emoji (Pro) — your own short text or an emoji. A Text field appears below the list for you to type it.
- Date (Pro) — today’s date. A Format list appears below, each option written out with today’s date: the day, the day and month, the weekday and day, or the weekday alone.
Color appears for Dot and Text/emoji. Green is the default, Same color of the text matches the marker to the rest of the complication, and Custom adds a Pick a color row that opens a colour picker.
In the free app the first two choices are yours to use. The other four show a small lock; tapping one offers the Pro unlock, and if you unlock, the marker you tapped is selected for you.
The marker colour
This small sheet (Pro) sets a colour of your own for the Dot or Text/emoji marker. It opens from the quiet marker screen when Color is set to Custom and you tap Pick a color. It covers the lower half of the screen and is titled “Marker color”.
- The large circle at the top previews the colour you have chosen.
- The fifteen swatches below it are the colours on offer: red, orange, yellow, green, mint, teal, cyan, blue, indigo, purple, pink, brown, white, grey and black. Tap one to choose it; a tick marks the current one, and the preview follows at once.
- The tick in the top right corner closes the sheet. Your choice is already kept by the time you tap it, so there is nothing to cancel or confirm.
Settings
The gear at the top left of the complication list opens Settings. From top to bottom:
- Pro unlocked, with a green seal, is what the first row reads once you own Pro. In the free app that place holds two buttons instead: Unlock Pro, with the price on the right, which starts the purchase directly, and Restore Purchases. Both are explained under Unlocking Pro. The line beneath says what Pro is: a one-time purchase that unlocks editable thresholds, other sensors like weather, and the truly-empty quiet marker.
- Pro is temporarily unavailable appears under those buttons, with a Retry button, when the app cannot reach the App Store for the price. Unlock Pro is greyed out until it can. Check your connection and tap Retry; while it is trying, the line reads “Checking availability…”. A line of small grey text below it gives the technical reason, which is useful to quote if you write to us.
- Help & troubleshooting opens the in-app help.
- Weather data by WeatherAPI.com, under “Data sources”, opens the website of the service that provides weather and air-quality data. It is free data, provided as-is with no guarantee of accuracy or availability; the app is not for safety-critical decisions.
- Share anonymous usage data is a switch, on by default. While it is on, the app sends anonymous usage events — which features are used, and reports of technical failures such as a configuration that did not reach the watch — through TelemetryDeck. They are not linked to you and contain no personal data. Turn the switch off and no analytics events are sent; you can turn it back on at any time. The privacy policy has the detail.
- Version shows the version of the app you have installed, followed by its build number in brackets. Quote it when you write to us.
Help: adding the complication to a watch face
The app carries its own help screen. It opens from Help & troubleshooting on the welcome screen and in Settings, and from More info in the message that follows Send to Watch, which takes you straight to the part about changes not showing up. There is nothing to set here; it is a page to read. It says:
Add the complication. Minimal Complications lives on your Apple Watch face, so the last step of setting it up happens on the watch:
- On your Watch, press and hold the watch face.
- Tap Edit, then swipe to the complications screen.
- Tap a slot, choose Minimal Complications, then pick Minimal.
Not seeing your changes on the Watch? Changes travel to the watch in the background, but watchOS gives every app a limited budget of background updates to save battery, so a change can take hours to show on the face. It is best to change your configuration once or twice a day rather than many times. The quickest fix is to open the Minimal Complications app on your Watch once: that pulls the latest settings immediately and refreshes the complication.
Jump from Watch to iPhone. While you are looking at a sensor in the Minimal Complications app on your Watch, your iPhone can open straight to that sensor’s editor through Handoff. On the iPhone, open the App Switcher (swipe up from the bottom edge and pause); a Minimal Complications banner appears at the very bottom. Tap it. Handoff has to be turned on for both devices (Settings › General › AirPlay & Handoff), and both have to be on the same iCloud account.
The screen ends with the same note about WeatherAPI.com weather data that Settings carries.
Unlocking Pro
Pro is a single one-time purchase. There is no subscription and no account. In the free app you meet the offer in three places: the banner above the complication list, the first row of Settings, and a full-screen offer that rises when you try something Pro is needed for, such as changing the battery threshold in the sensor editor, or tapping a locked quiet marker. Once you own Pro, none of them appears again.
The full-screen offer holds:
- A headline and a short description of what Pro adds: the truly empty quiet marker, weather and air-quality sensors, and thresholds you set yourself. The wording is one of three versions and may differ from one iPhone to another; what you get is the same.
- The unlock button in the middle, reading Unlock Pro or Get Pro with the price in your currency and the note “Launch price”. Tap it and Apple’s own purchase sheet appears; you confirm there as for any App Store purchase. The offer closes by itself as soon as the purchase goes through. If you cancel, nothing is charged and the offer stays. The button is greyed out, with no price, while the app cannot reach the App Store.
- Pay once. Yours forever. is the line below it, and it means what it says.
- Restore Purchases, under that line, is for when you have already bought Pro — on another iPhone, or before deleting and reinstalling the app. It asks the App Store what your Apple Account owns and unlocks Pro again at no charge. You rarely need it: the app checks by itself each time it starts. Use the same Apple Account you bought with; if Pro does not come back, check your connection and try again.
- The × in the top right corner closes the offer without buying. Whatever you had been trying to change goes back to what the free app allows.
Apple processes the payment. We never receive or store your payment details, and we keep no record of our own of who owns Pro: that lives in the purchase history of your Apple Account.
On your Apple Watch
The watch app in the free app
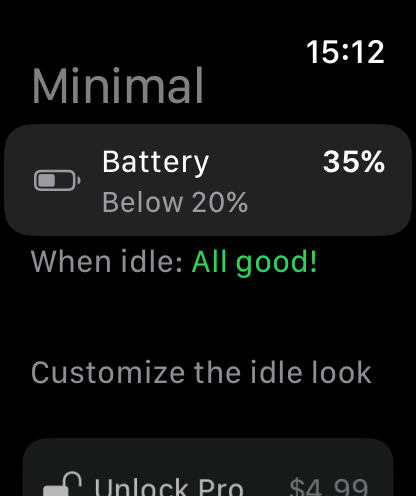
The app on your watch is titled Minimal. It opens when you tap the complication on the watch face, or from the watch’s app list. It is a place to look, not to change things: it shows what the complication is watching and what each sensor reads right now. All the setting up happens on your iPhone.
- The sensor row shows the sensor’s icon and name, its rule underneath (“Below 20%”), and the current reading on the right. The reading is white while all is well and turns orange once it has crossed the threshold. Here the battery is at 35%, above the 20% line, so the complication is quiet. Tap the row for the same three things on a screen of their own.
- When idle: names the quiet marker the watch face shows while nothing needs you, drawn in the marker’s own colour. If your slot ever looks blank, this line tells you what it is meant to show.
- The grey line below it names one thing Pro adds. It changes each time you open the app and is not a button.
- Unlock Pro and Restore come next as you scroll. The next section says what each does.
- Configure in the Minimal Complications app on your iPhone. is a reminder of where the settings are.
- Weather data by WeatherAPI.com ends the screen. It credits the service that provides weather and air-quality data, and the notice under it says that the data is for general information only and is not meant for safety-critical decisions.
Each time you open the watch app it picks up the latest settings your iPhone has sent and refreshes the complication. A small spinner at the bottom of the screen shows while it does.
The watch app with Pro
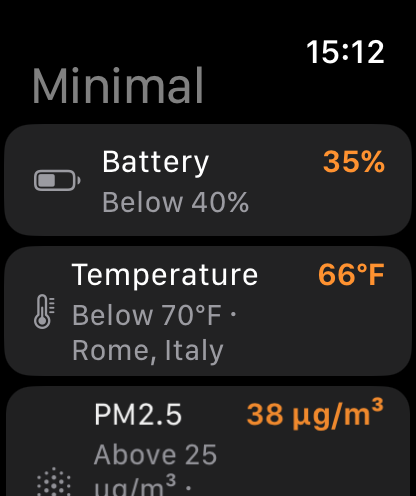
With Pro the same screen lists every sensor you put in the complication on your iPhone, in the order you gave them. Weather and air-quality rows also name their location. In the picture all three readings are orange because each has crossed its threshold; the first orange row from the top is the one the watch face shows. The When idle: line and the reminder about your iPhone follow the list as in the free app, and the screen ends with the same credit and notice about the weather data. The grey line and the two buttons are gone.
You still cannot edit anything here. To change a sensor, open it on the watch and use Handoff to jump to its editor on your iPhone, as the help section describes.
Unlocking Pro from the watch. You can buy Pro on the watch as well as on the iPhone. It is the same single purchase, so you pay only once.
- Unlock Pro shows the price in your currency. Tap it and Apple’s purchase sheet appears on the watch; a spinner replaces the price while it is open. If you cancel, nothing is charged.
- Restore is for when you already own Pro. It asks the App Store what your Apple Account owns and unlocks Pro at no charge. The watch also checks by itself each time the app starts, so you rarely need it.
- Pro unlocked, with a green seal, replaces both buttons once the watch knows you own Pro. The watch tells your iPhone, but your sensors and settings live on the iPhone, so the line under it reads “Your Pro features will appear once your iPhone syncs.” Until then the list stays as it was; afterwards this line goes away too.
- Unlock Pro on your iPhone appears instead of the buttons when the watch cannot reach the App Store. Buy from the iPhone app, or try again later.
The complication on the watch face
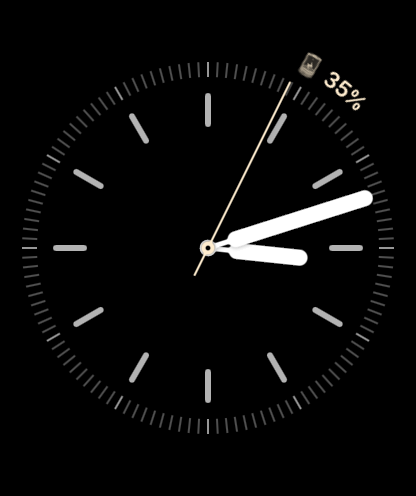
This is what the app is for. The complication fits the small slots a watch face offers: circular, corner, the single line of text some faces carry, and the wider rectangular slot. Adding it to a face is covered above. It reads in one of three ways.
- At rest, when no sensor has crossed its threshold, the slot shows your quiet marker. In a rectangular or single-line slot that is the text itself, such as “All good!”. In a circular or corner slot it is a small symbol instead: a green check for “All good!”, an outline for the light ring, a filled dot for the dot. Your own text and the date are scaled down to fit. With Nothing (truly empty) the slot is blank, and tapping it still opens the app.
- When a threshold is crossed, the marker gives way to the sensor: its symbol and its current value in white, as in the picture. If several sensors have crossed at once, the one highest in your list takes the slot. A rectangular or single-line slot adds a small +1, +2 and so on for the others; a circular or corner slot shows only the winner. In a corner slot the value curves along the edge of the face. When the reading goes back to the safe side of its threshold, the quiet marker returns.
- Before you have opened the watch app for the first time, the slot reads TAP, or Tap to set up where there is room. Tap it. The watch app opens, fetches your settings, and the complication switches to its real state.
Tapping the complication always opens the watch app, where you can see every sensor and its reading. That is the place to look when the slot shows +1 and you want to know what else has crossed.
The face does not update every second. watchOS limits how often a complication may refresh, so a reading can be a little behind, and a change sent from your iPhone can take a while to arrive. Opening the watch app brings it up to date at once.
Contact
Something not covered here, or not working as described? Write to hariseldon78.apple@gmail.com.
For what data the app uses and why, see the privacy policy.